Live data
Description
By Live data we mean the immediate provision of results for the participant, speaker and organiser during the event. In orienteering, live data can be used to provide an intermediate result from a checkpoint or to announce the next finisher. At MTB Enduro events, live data can be used, to directly display the stage times for the riders on the Internet and at the event area.
Live data transmission thus consists of two sub-processes:
- The transmission of time stamps from the measuring point (e.g. control point or stage finish) via the Internet to the evaluation PC.
- The evaluation of results on the evaluation PC and the transmission of the results to a display, e.g. the Internet.
The basic setup of the system is given in the scheme below.
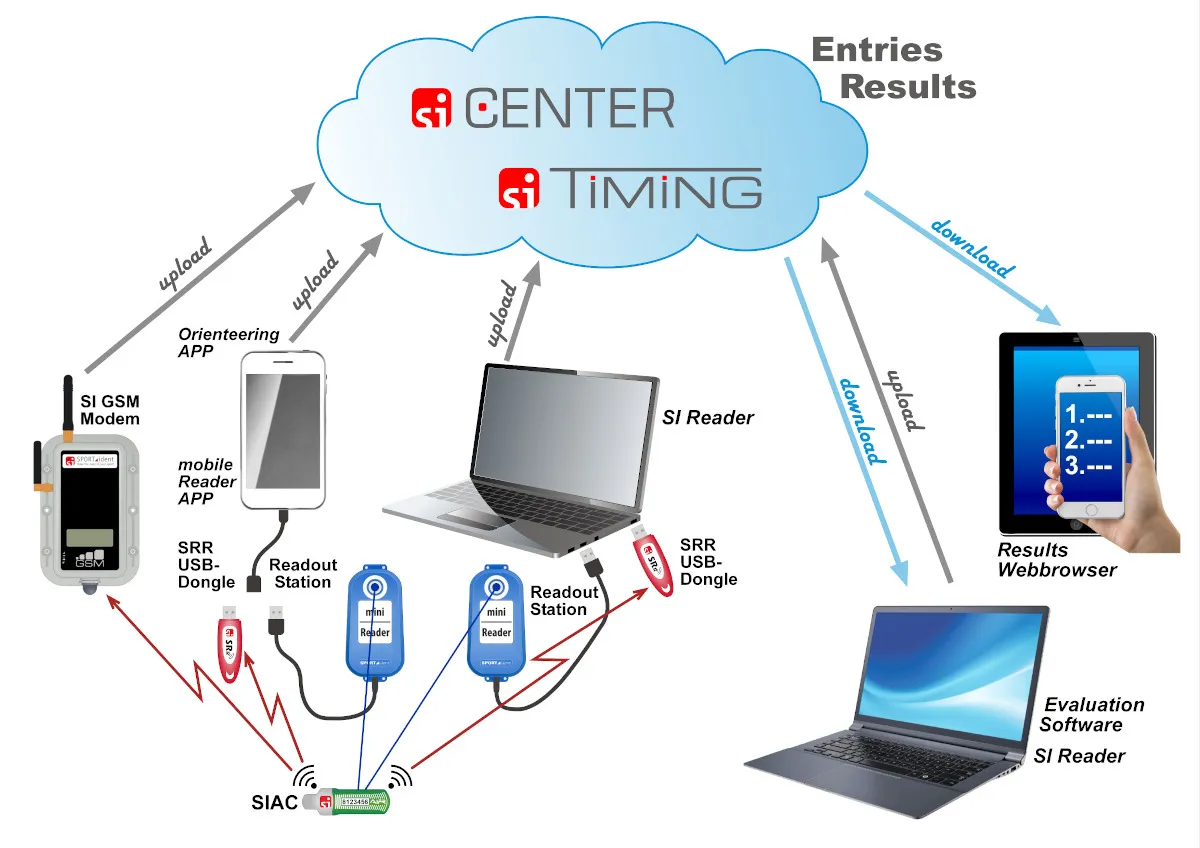
How do you get the time stamps of your card?
- You can download them with a readout station.
- You can use a BSF8-SRR control station, which sends the time stamp of the last punching via short range radio (SRR) to a receiver.
- If you use SIACs you can also send data via SRR.
SRR receivers can be the SRR USB Dongle or the SI-GSM.
The data must now be transmitted via the Internet. The SPORTident Center serves as data hub (Cloud). As a transmitter are available:
- the SPORTident Mobile Reader App,
- the SPORTident Reader as desktop application,
- or the SI-GSM which transfers the data directly to the SPORTident Center.
To receive the data again at the evaluation PC, the SPORTident Reader can be used or the evaluation software SiTiming.
You are using SiTiming and just want to upload the results or an intermediate result to the SPORTident Timing website, then jump straight to section upload results to SPORTident Timing website.
Software and web services
This section gives an overview of the available software and web services.
SPORTident Center
The SPORTident Center serves as data hub (Cloud). It is hosting the database that stores information on events, modems and timing data. The service allows you to assign your SI-GSM Modem to an event for a certain period. The data received by this modem are displayed.
You can register yourself for SPORTident Center.
SPORTident Mobile Reader App
The SPORTident Mobile Reader is the (free) Android app for your smartphone reading out cards, receiving punch data via short range radio, and uploading the data to SPORTident Center.
For detailed information regarding the SPORTident Mobile Reader App visit the SPORTident website.
SPORTident Reader
SPORTident offers the (free) software SPORTident Reader for your PC as a universal data capture program. It is able to upload data to SPORTident Center. This data can be read directly from the SI-Card or received by the SRR USB Dongle via radio from SIAC or a BSF8-SRR station (in addition to the data from a SI-GSM Modem, that are directly sent to SPORTident Center). Furthermore the SPORTident Reader is used to download the data from SPORTident Center to an evaluation software. However, downloading data is frequently done directly by an evaluation software such as SiTiming.
SPORTident Reader can be downloaded from the SPORTident website.
SiTiming by SPORTident UK
SiTiming is a SPORTident UK Ltd results software. A license has to be bought if you want to use this software, for further information visit the SPORTident UK website.
SPORTident Center
The first step to upload data is the setup of the available modems for an event. Open SPORTident Center (Admin classic) in your browser. Four tab sheets are available: Events, Modems, Billing and Subscriptions.
Events
Create a new event by clicking the [+] button. Choose the name, start date and end date of the event and complete the process by clicking [create]. Your event will now be added to the event list.

Any event can be modified by clicking on the pencil. Some additional information is shown.
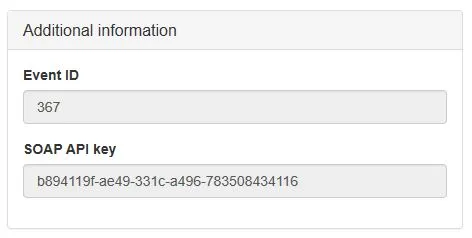
The Event ID and the SOAP API Key are necessary for the SPORTident Reader program to be able to upload and download data.
Modems
The list displays the available modems assigned to the user. The modems are assigned by SPORTident to a user. There is no possibility to add a modem by yourself. In case of questions, please contact timing@sportident.com.

An icon indicates the state of the modem (grey if offline, green if online) and its battery level. This is useful information for testing the modem on site before the event (or even to monitor the modem during an event).
A modem can only be assigned to a single event at the same time. To assign a modem to an event, click on the flag icon at the top right of the screen.

Some extra fields are shown. Select one of your events from the list, choose a modem and confirm it. The modem is now assigned to that event.
Monitor

The monitor provides an overview of the data received. Go to the event page and click [Monitor punches] of your event. You can filter the punches by event, modem, card (enter the card number) or for any control number (enter the control number) for a selected time period. The default setting is the day and time of opening the program. The display is updated periodically.
Data upload with SPORTident Mobile Reader App
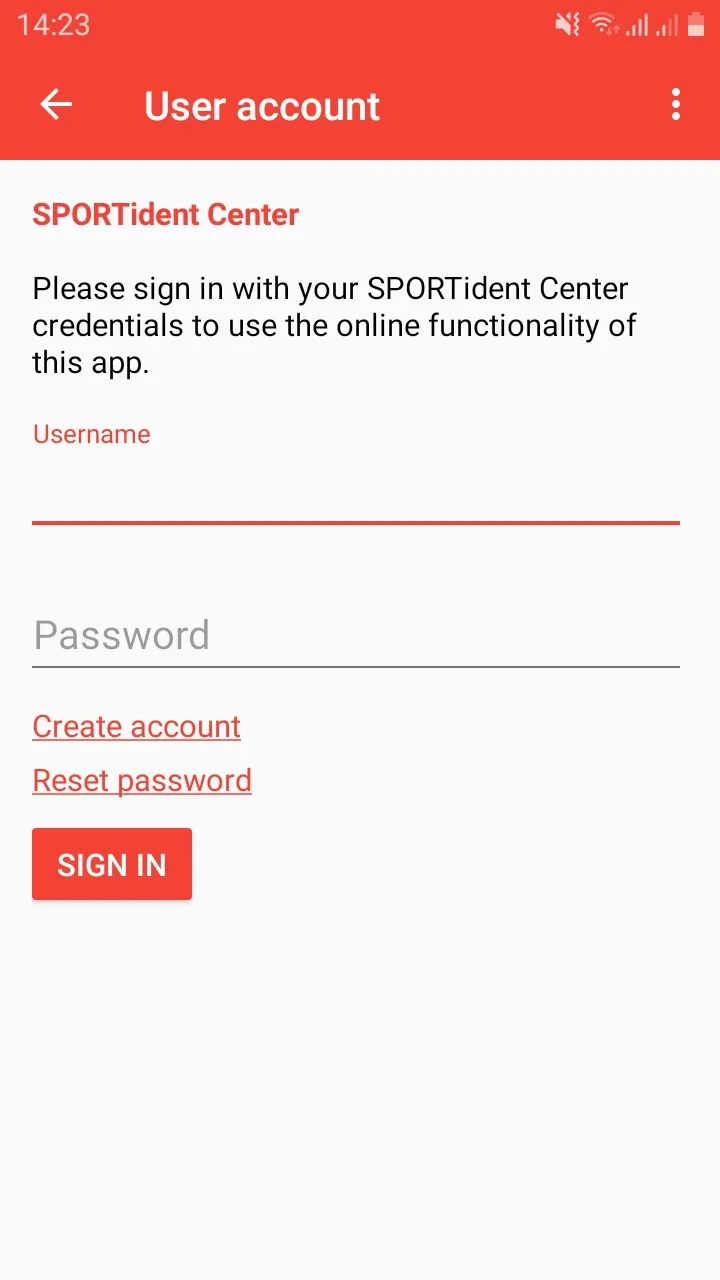
After installation, the app must be linked to SPORTident Center. To do this, go to Settings > User account and enter your credentials to use the online functionality of the app.
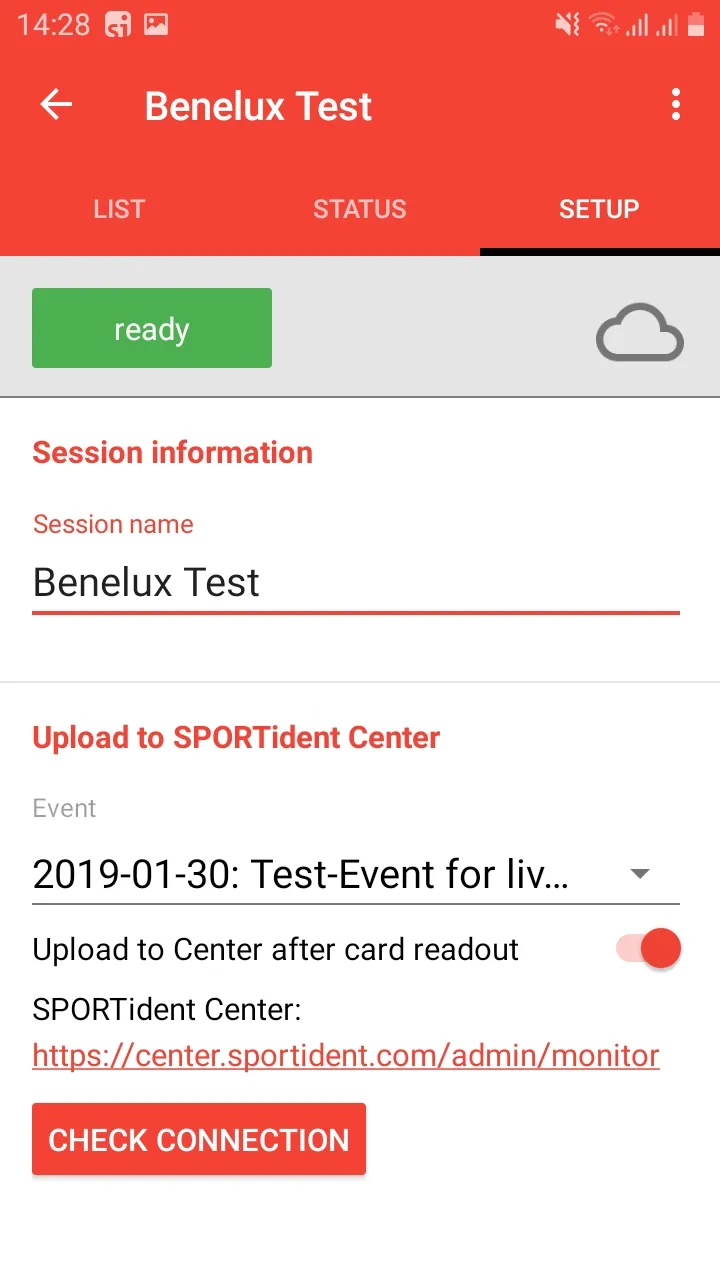
Create a new event / session by tapping on the plus [+] on the start page. Enter a user-defined session name and select the corresponding event in SPORTident Center or use the function to create a new event in SPORTident Center. When you are asked, enable the automatic upload of the data. The app thus uploads received data directly to SPORTident Center.
Connect your SRR USB Dongle, BSM7-USB or BSM8-USB station using a USB OTG adapter cable to your smartphone.
Download your chip or send the data by radio to the smartphone. The received data is displayed in the List menu. The punches are uploaded directly into SPORTident Center.
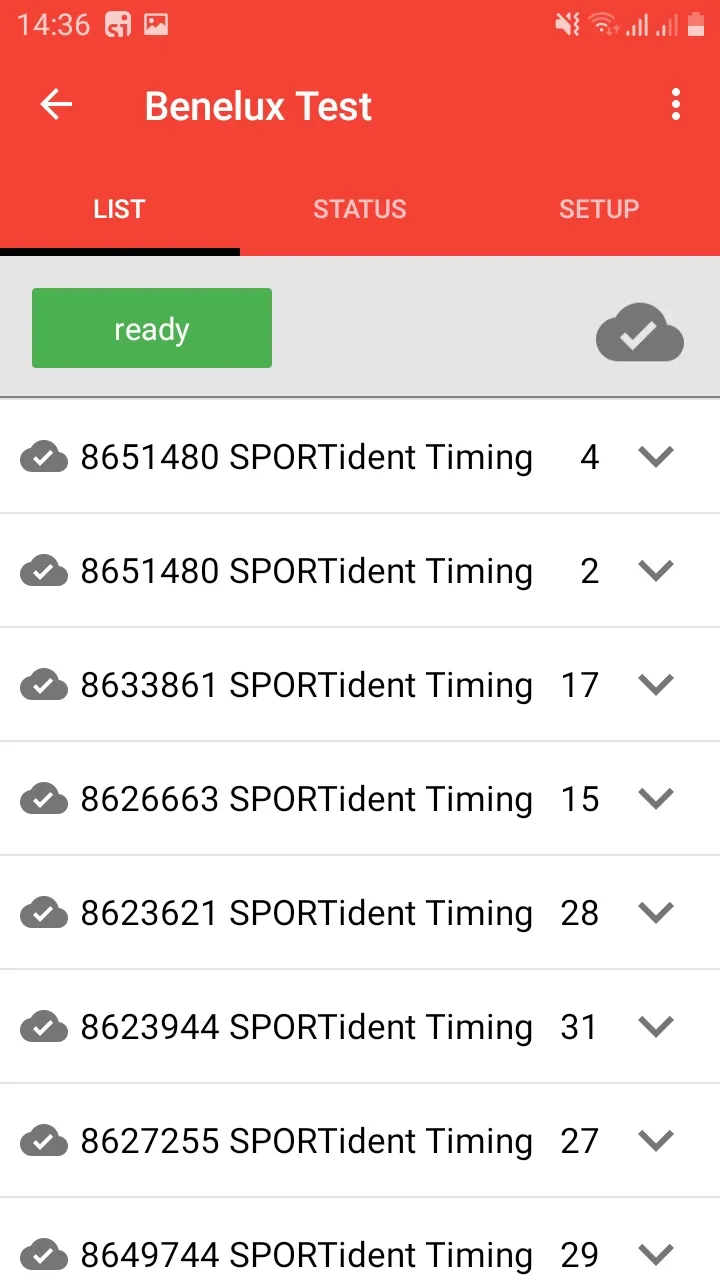
Video: SPORTident Mobile Reader App
Data upload with SPORTident Reader
After installing the program SPORTident Reader, it might be necessary to click [Show/hide settings] in the configuration bar.
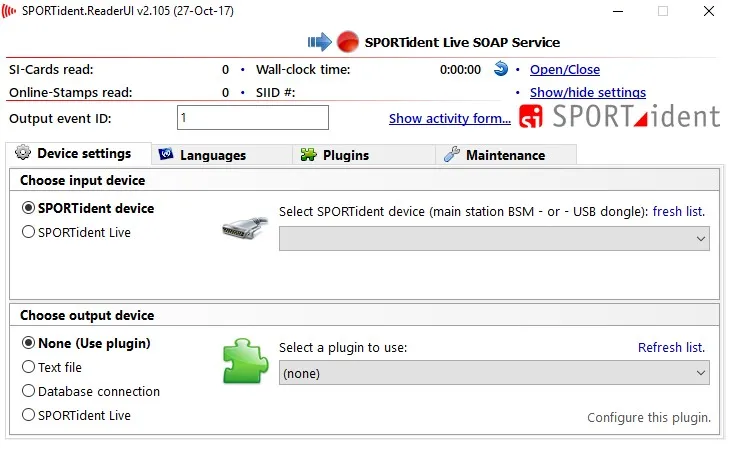
Uploading data to SPORTident Center
The data collected with a readout station or a SRR USB Dongle (the input device), from a single punch up to all data records from a SI-Card, can be uploaded to SPORTident Center (the output device). The configuration of SPORTident Reader is a three steps procedure:
-
Configure the input device
 Connect a readout station or a dongle to the computer and click on [refresh list].

-
Configure the output device
 As an end user you will use the output to [SPORTident Live] (SPORTident Live here means SPORTident Center). The other available output options are addressed to developers of evaluation software.
The API Key and Event ID of the target event have to be copied from SPORTident Center into the specified fields.

-
Activate the connections
 The summary of the configuration is given at the top of the screen, in this example from a readout station (the input device) to SPORTident Center (the output device). The connections are not active yet and this is visualized by the two red dots.
 Click [Open/Close] to open (or to close) the connections. Two green dots will confirm that the communication lines are open. SI-Reader is now ready to receive and to upload data.
The data transmission can be monitored in the SI-Reader protocol. To open the protocol, click on [Show activity form…].
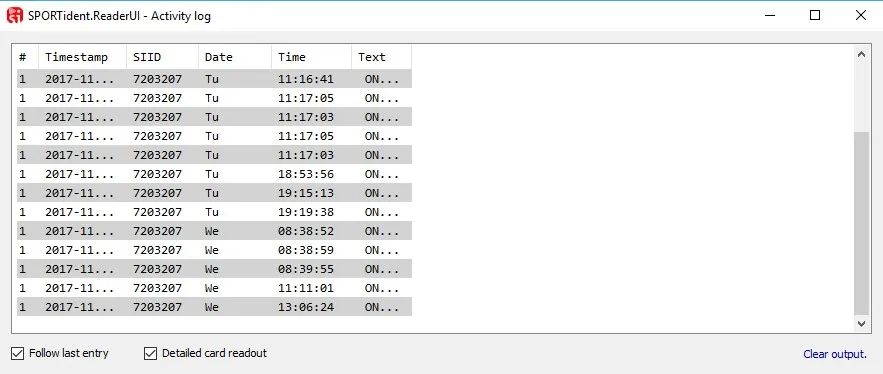
Data processing with SiTiming
Download raw data
- First you have to configure your connection to SPORTident Center as a Telemetry Device.
Open your event in SiTiming and navigate to Data Collection > Collect Punches > Telemetry Device > Add Telemetry Device. - Select as Device Type SPORTident Center and enter your Event ID from SPORTident Center. Enter any description you like.
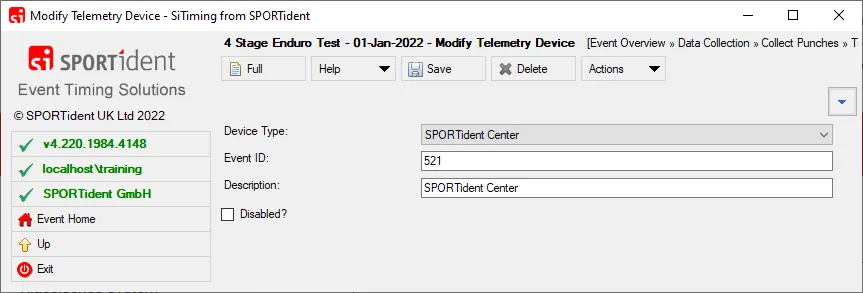 Click the [Save] button.
 - Go back by clicking the [Up] button. Now you’ve get a new menu item SPORTident Center Receiver. Enter this menu.
Enter the following Service URL:
https://center-origin.sportident.com/stamps/soapand the API Key of your event. You will find the API Key in SPORTident Center. - To download the data once click the [Refresh Now] button or select the refresh Interval and click the [Start Timer] button for continuous download.
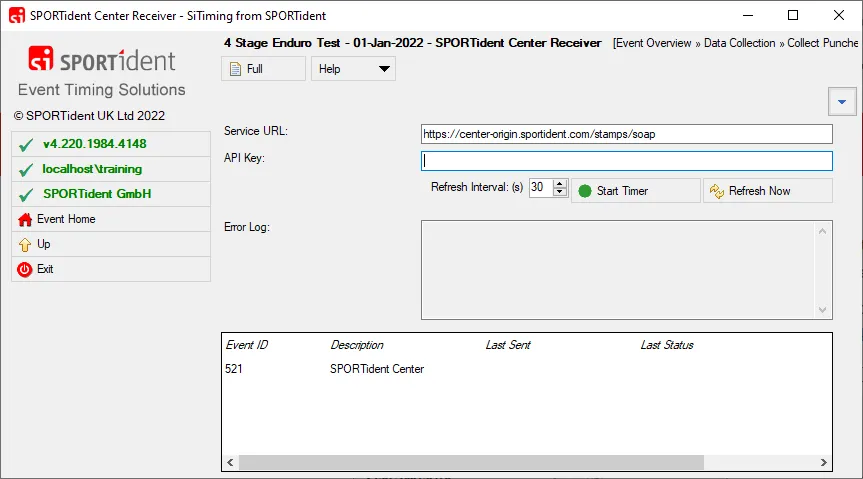
- To stop the continuous download click the [Stop Timer] button.
Upload results to SPORTident Timing website
- For the upload of the live results to the website you will open a new SiTiming instance.
- Open your event in SiTiming and navigate to Results > Export Results > Result Loader.
- Enter the Service URL and Token for your event. Both you will get from the SPORTident Timing website. If you need assistance in setting up the SPORTident Timing website, please contact timing@sportident.com. We will be pleased to send you the URL and the Token.
- To upload the data once click the [Write Now] button or select the refresh Interval and click the [Start Timer] button for continuous upload.
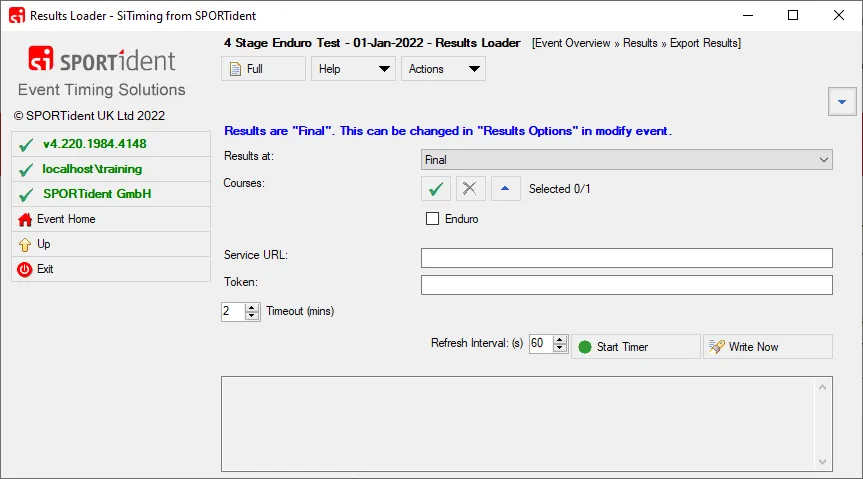
- To stop the continuous upload click the [Stop Timer] button.
